Last Updated: May 12, 2026
The Shopify Custom App integration requires a Shopify Grow, Advanced, or Plus pricing plan. It does not work with a Basic plan.
The InfiPlex Order Management System (OMS) can integrate with your Shopify store to retrieve order data and provide shipping tracking information and inventory levels. To connect InfiPlex to your Shopify store, please follow the instructions below to create a Custom App in your Shopify Admin.
Shopify Security Requirements: The user creating the Custom App must have Administrator role access and Developer App access with the "Manage and install apps and channels" box ticked to add new apps. No charges are processed through the InfiPlex Custom App that is created.
Shopify App Development

- Shopify Custom App Installation:
InfiPlex requires the set-up of a Custom App in Shopify to connect with your store's API. Follow these steps to set-up your Custom App:- Go to Settings (lower left of your Shopify admin area):

- Click the Develop Apps Button:
Click Apps in the left menu and click the "Develop Apps" button on the top right of the Apps page.

- Select Build Apps:
This will open the App Development page, where you can click the "Build apps in Dev Dashboard" button to build your custom app.

Or you can click here to go directly to the Shopify Dev Dashboard.
- Build Your Custom App:
- This will open your Shopify Dev Dashboard in a new window.
Click the "Create app" button at the top right of the page.

- Use the "Start from Dev Dashboard" form on the right side to create your new app.
Name the app "InfiPlex-OMS" and click the "Create" button.

- This opens the Create App Form fields that you can fill out using the values from your InfiPlex OMS Shopify Settings area.
Open your InfiPlex OMS site in a new window to copy the required values into the Custom App form.- In InfiPlex OMS - Go to Settings > Integrations > Store > Shopify.
In the first settings area (shopify_1_pull_private_app_client_id), you will see 3 fields you can copy into your Custom App in the Shopify Dev area.
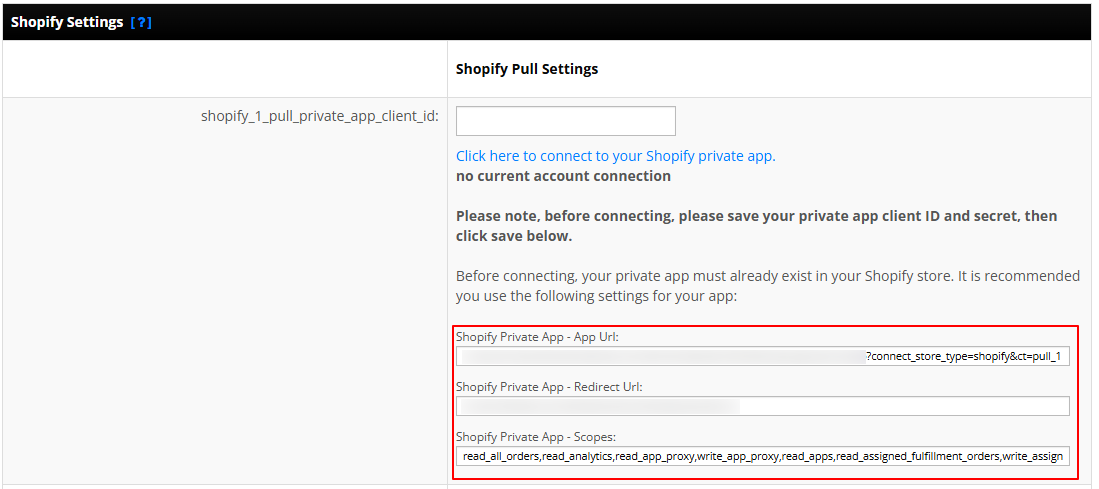
- Shopify Private App - App Url
- Shopify Private App - Redirect Url
- Shopify Private App - Scopes
- In InfiPlex OMS - Go to Settings > Integrations > Store > Shopify.
- Custum App form fields in your Shopify Dev area:
- App name: Already filled in from previous page.
- App URL: Copy and paste the Shopify Private App - App Url from Infiplex.

- Embed app in Shopify Admin: Uncheck this option.
- Webhooks API Version: Leave this as the default.
- Access - Scopes: Copy and paste the Shopify Private App - Scopes setting from your InfiPlex OMS settings.

- Access - Optional scopes: Leave this blank.
- Access - Use legacy install flow: Leave this unchecked.
- Access - Redirect URLs: Copy and paste the Shopify Private App - Redirect Url from your InfiPlex OMS settings.
- SAVE the app: SAVE the app by clicking the "Release" Button at the bottom of the page. This will open a pop-in window asking you to give it a version name, you can leave this blank. After saving the Release, you will be sent to the Shopify Dev Dashboard App page.

- This will open your Shopify Dev Dashboard in a new window.
- Connect The Custom App with InfiPlex:
From your Shopify Dev area, get the keys for your custom app and paste them into InfiPlex.- In the left menu, click the "Settings" menu item under the new "InfiPlex-OMS" App you just created, and copy the App's Client ID and Secret.

- Paste these keys into the InfiPlex OMS Shopify Settings.
- In InfiPlex, Go to Settings > Integrations > Shopify.
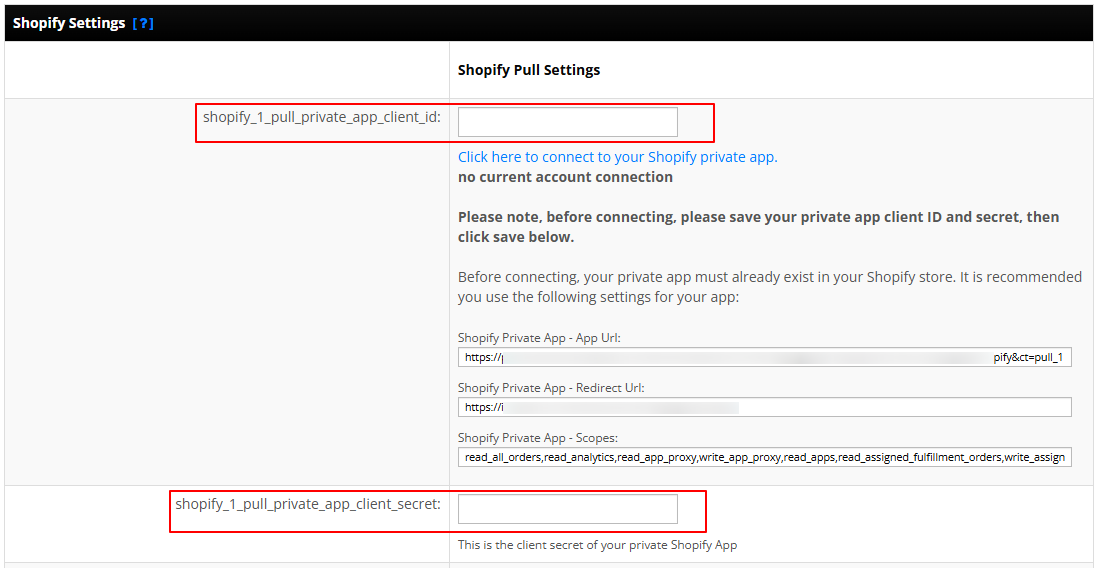
- Paste the Shopify Client ID into the InfiPlex shopify_1_pull_private_app_client_id setting.
- Paste the Shopify Secret into the InfiPlex shopify_1_pull_private_app_client_secret setting.
- SAVE the settings: Scroll to the bottom of the settings page and save the settings.
Important:
The InfiPlex Shopify Client ID and Client Secret settings must be saved before trying to install the app, as outlined below in section 6.
- In InfiPlex, Go to Settings > Integrations > Shopify.
- In the left menu, click the "Settings" menu item under the new "InfiPlex-OMS" App you just created, and copy the App's Client ID and Secret.
- Installing the Custom App:
There are two ways to install your App, with details outlined below.- Install from Shopify:
This is the recommended option. It is a slightly faster than option 2 below, and takes about 1 minute to complete.
After saving the Client ID and Secret in the InfiPlex Shopify settings mentioned earlier, you can install the custom app from your Shopify Dev Dashboard. To do this, navigate to the InfiPlex-OMS App page in your dashboard. Then, click on the "Home" menu item in the left sidebar under the new InfiPlex-OMS app to begin the installation of the custom app.

- From the Shopify Dev - InfiPlex-OMS Custom App Home page, click the Install button at the top right of the page. If you are on a mobile device, the Install buttom may be at the bottom of the page.
- This will send you to your store to approve the custom app installation.

- Click the Install button to add the Custom App to your Shopify store.
The InfiPlex-OMS Custom App is now connected with your InfiPlex OMS site to start managing orders and inventory. You will need to review and complete the rest of the InfiPlex - Shopify settings outlined below in the "Update Your InfiPlex OMS settings" section.
- Install from InfiPlex:
This option takes a few minutes to complete since you will need update the myshopify URL setting. Option 1 above will update this setting for you automatically, and takes less than a minute to complete.
Connecting the custom app from InfiPlex requires you to add your Shopify store's "myshopify.com" URL to the InfiPlex settings as outlined below. Do this step first.- Add your Shopify URL:
- Update the setting shopify_1_store_url with your myshopify.com store URL.
How to get your myshopify.com URL:- Log into your Shopify store, and type the following question in the Search bar at the top of your Shopify Admin area:
"what is the myshopify.com url?"
The Shopify help system will tell you what your URL is. The URL will be something like mystorename.myshopify.com.

- Log into your Shopify store, and type the following question in the Search bar at the top of your Shopify Admin area:
- Click SAVE at the bottom of the Shopify settings to save the URL setting. You must save this setting before going to the next step below.
- Update the setting shopify_1_store_url with your myshopify.com store URL.
- After saving your Shopify settings with your myshopify.com url above, the settings will reload. Click the "Click here to connect to your Shopify private app" link to connect InfiPlex to your Shopify Custom App.

- This will open a pop-up window that will connect to your Shopify Custom App with the keys you have added to InfiPlex. Please note that the pop-up may get pushed behind your current open browser window, so you may have to select it in your windows bar on your computer. The Pop-up window will display the word "Success" upon successful connection with your Shopify InfiPlex-OMS custom app.
- The InfiPlex-OMS Custom App is now connected with your InfiPlex OMS site to start managing orders and inventory. You will need to review and complete the rest of the InfiPlex - Shopify settings outlined below in the "Update Your InfiPlex OMS settings" section.
- Add your Shopify URL:
- Install from Shopify:
- Go to Settings (lower left of your Shopify admin area):
- Update Your InfiPlex OMS settings
- Go to Settings > Integrations > Stores > Shopify to view the Shopify settings
- You will see the Main Shopify Pull settings at the top of the page. The Shopify Push settings are at the bottom half of the settings page.
Multiple Shopify Store Connections:
The InfiPlex Shopify store settings include the ability to connect up to 3 different stores. The shopify_1_pull settings are shown below. You can also use the shopify_2_pull and shopify_3_pull settings if you have additional stores you want to connect.
The Shopify Push Settings at the bottom of the settings page need to be left blank. If you want to push orders to a Shopify store, that is what the Shopify Push Settings are for. You can go here for details on the Shopify Push set up.
If you need help from Support to configure your connection, please contact us or open a Support Ticket from your OMS.
- shopify_1_pull_private_app_client_id: Already set from connecting your Custom App as outlined above.
- shopify_1_pull_private_app_client_secret: Already set from connecting your Custom App as outlined above.
- shopify_1_pull_orders_enabled: set this to yes
This controls if orders from Shopify are pulled into the OMS system - shopify_1_store_url: already set from connecting your Custom App as outlined above.
This is the base url for your Shopify store. Do not include http:// or https://. Example Value:
mystore.myshopify.com - shopify_1_api_key: Old setting - leave blank.
- shopify_1_api_password: Already set from connecting your Custom App as outlined above.
This is the Admin API access token provided by Shopify for your Custom App. - shopify_1_store_order_source_identifier:
This is the order source identifier that will be saved for any order pulled with this connection. It is highly recommended that this is unique. Example value:
MyStore Shopify 1.
If you use all three Shopify connections, each one should have a unique identifier. - shopify_1_pull_orders_from_date:
This is the earliest date to pull Shopify orders from. If left blank, it will pull from the current time. This is only used when you first activate the connection. Changing it in the future will have no effect on anything. The default is to leave it blank. - shopify_1_send_tracking_numbers:
Set this to yes to send tracking numbers back to your Shopify store. This controls if tracking numbers are sent back to Shopify for Shopify orders. Default setting no. - shopify_1_tracking_numbers_location_id: This is REQUIRED
If tracking numbers are sent back to Shopify and this is set, then all shipments sent to Shopify will use this location ID. You can get a location ID from your Shopify admin area by going to Settings > Locations > Location Name. When editing the location, you will see the location ID at the end of the URL for the Location Edit page.

- shopify_sos_enabled:
Set this to yes to send inventory back to your Shopify store. This controls if inventory levels are sent to Shopify on selected SOS (Sell On Shopify) products. Please note that this enables this for all Shopify stores that you set-up in the Shopify settings area. Default setting is no.
- Activate Your Sell On Shopify SKUs
- Go to Shop > SellOn > Shopify to view the SKUs activated for your Shopify connection(s).
- Do an initial download of your Shopify products by clicking the purple Download Shopify Products button
- You must then go and activate the SOS option on each product individually, or you can click the green Set All Shop Products as SOS button. This will set all of your products in the OMS as SOS products.
- Reload the Sell On > Shopify page to now view your Shopify SKUs. Please note that the system will only flag a SKU as currently active on shopify if that SKU number exists in the download of SKUs from Shopify.
- Inventory updates are only sent for SKUs that are shown as currently active on shopify on your Sell On Shopfy listing page.
Enable Product Inventory updates for Your Shopify Store
In order for the OMS to know what products need inventory updates for your Shopify store, please follow these steps below.
- Upload your SKUs into the OMS
See the OMS Product Upload Knowledge Base article on how to do this. - Flag the SKUs that are in your Shopify Store
See item 2 on the Getting Started Instructions. This allows you to flag SKUs to specific marketplaces for inventory updates. - Download Product ID information from Shopify
Go to the Sell On > Shopify page to a list of SKUs associated to your Shopify store. In order to actually send inventory updates to Shopify, InfiPlex needs to know the Product and Inventory IDs from Shopify. To have InfiPlex pull these, click the orange Download Shopify Product IDs button to associate the appropriate Shopify database IDs with the SKUs you have flagged as being sold on Shopify. Please note that this only pulls the IDs from Shopify and not the product data. Any matching SKUs in Shopify found on your Sell On Shopify page will be displayed with currently active on shopify under the SKU number. This confirms that we will be able to successfully send inventory updates for that SKU.
Important: It may take a while for the Shopify Product IDs download to complete if you have a large number of SKUs, 500+. - Contact Support if you need assistance with this process.